You Can Cook

No comments

When you're young, utensils tend to be optional—and eating with your hands is optimal. One of the best examples of finger food for kids that has pervaded today's nostalgia-driven culture is tater tots.

Tater tots are one of those snacks (or meals) that pairs well with just about anything. Whether you like to dunk yours in ketchup or top them with melted cheese and chili, we can all agree that tots in any preparation make the world a better—and more delicious—place.

Today, I'll be showing you how to use fresh ingredients to make these delectable snacks from scratch. Once you try homemade tots, you'll never pick up that frozen bag at the grocery ever again!


Ingredients:

  •     4 Russet or Yukon Gold potatoes, peeled
  •     Canola oil
  •     1 Tbsp. of salt
  •     1 tsp. cracked, black pepper
  •     1 egg, beaten
  •     ½ cup of all-purpose flour
  •     ½ tsp. garlic salt
  •     Additional salt and pepper, to taste

Directions:

  1.     Shred the potatoes on a box grater. (Alternatively, you can use a potato ricer if you own one.)
  2.     Use a kitchen towel to squeeze out any excess liquid from the grated potatoes.
  3.     Place the potatoes in a bowl and season them with the salt, pepper, and garlic salt.
  4.     Add the beaten egg and mix well.
  5.     Then add the flour and stir to incorporate all the ingredients

6.Pour the canola oil in a deep pan with a heavy bottom. The amount of oil should be enough to come halfway up the sides of the pot.

7.Heat the oil to 375°F.
8. Form the potato mixture into tots—about an inch in diameter.


9. (Optional): If you would like to use the tots at a later date, freeze them at this point instead of frying them. Lay the tots in a resealable, plastic bag without letting them touch one another. Do not stack them or the tots will freeze together. Place the bag horizontally, preferably on a flat space in the freezer.


 10.   Place them gently in the hot oil, frying them in small batches without overloading the pan. Do this for four to five minutes, turning them once or twice, until they are golden brown on all sides.


   11. Remove the tots from fryer and drain them on a paper towel-lined tray.
   12. While they are hot, season with a bit more salt and pepper, to taste.
   13. Transfer to a serving plate and serve.


When Frying Frozen Tots: Keep an eye on the oil temperature and do not crowd the pan. The frozen tots will lower the oil temperature and they will take longer to fry, soaking up oil along the way. The less time the tots spend in the hot oil, the better!

Hands Off My Tots!

Hot, homemade tater tots are great on their own, but don't let that stop you from getting creative. Add 1 cup of shredded cheddar cheese to the raw potato mixture, ½ cup of chopped chives, ½ cup of cooked bacon, or all a combination of the three to turn your tots into a creative spin on stuffed, baked potatoes.

As for sauces, ketchup is the norm... but if you'd like to try something different, add 1 Tbsp. of Sriracha to ½ a cup of mayo for a spicy dipping sauce with an extra kick.

However you choose to enjoy your tots, I'm sure you can agree that they certainly aren't just for kids anymore. Let us know in the comments if you've got any especially awesome ideas for how to enjoy these homemade tots!
Readmore →

No comments

Food is a necessity, sure, but every now and then it's so satisfying to eat something because it is fun and delicious. While eating a whole tub of homemade ice cream might satisfy your need for gluttony, there's a way to take it even further—make your dinnerware edible.

The Best Dessert Innovation of the 21st Century

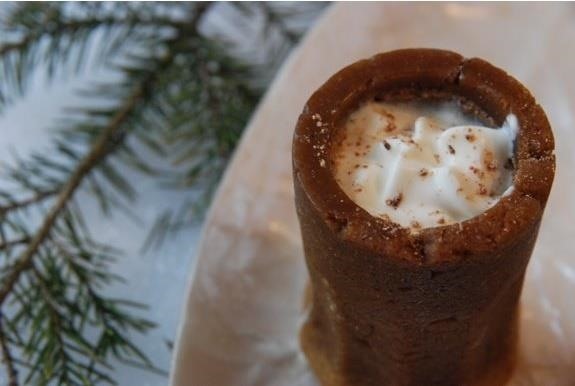
We've already shown you how to make edible chocolate dessert bowls using balloons, but there's something even better now—chocolate chip cookie cups. Turns out, chocolate chip cookie dough is the perfect base to form edible bowls and cups for panna cotta, ice cream, and even good 'ol milk.


But before you rush out and make your own cookie dough or buy some pre-made, read on, because there are some tricks you need to know to create leak-proof and yummy chocolate chip cookie containers. After all, you don't want them falling apart in your hands, do you?


The Delicious Science Behind the Cookie Shot Glass

Dominique Ansel, the chef/inventor behind the cronut (that's a croissant-doughnut hybrid) originally debuted chocolate chip "shot glasses" at this year's SXSW. Each container was just the right size to hold a single draught of ice-cold organic milk. Yum, right?

However, the shot glasses were made from an "extra-aerated" dough that was also thinner and drier than your basic chocolate chip cookie dough. To keep the milk from soaking through the cookie and to add extra flavor, the inside was coated with a thin layer of chocolate, although others have used royal icing or a sugar glaze to coat theirs.


How to Make These Suckers Yourself
You can reproduce these yourself at home with a few modifications. If you don't have special molds, you can use a muffin tin.


PopSugar suggests in the video above going to a cooking supply store and looking for aluminum cups that are more the size and shape of a traditional shot glass.


Karin Lee over at Instructables took a more DIY approach using a popover pan, along with parchment paper, old wine corks, cardboard tubes, tinfoil, and masking tape.

No matter what you use, be sure to apply liberal amounts of cooking spray so the cups won't stick when you need to remove them.


Next, you need to let the dough rest rather than stirring together all the ingredients and immediately placing the dough in the oven. This "aerates" the dough and lets the ingredients meld for better flavors.

If you have time, try to let the dough rest for several hours inside the refrigerator either by itself or when it's in your molds—this will increase the effect.


When it comes to the dough, you want something a little drier and more crumbly—almost like a cross between a shortbread or pie crust dough and a more traditionally wet cookie dough. Experiment with using less flour and using only white sugar and baking powder in your cookie dough. As explained in Yumi's guide to perfect chocolate chip cookies, all these contribute to thinner, crisper cookies.


There's also a great recipe for chocolate chip cookie bowls that chef Michael Ruhlman adapted so the dough could hold ice cream. Be aware too that some home cooks who have made these shot glasses recommend a heavier base for the glass (in case it's left standing around) as well as a longer baking time than with traditional chocolate chip cookies.

Be sure to use mini chocolate chip morsels rather than the regular-sized ones. You'll want to press the dough thinly around your shot glass "molds" and regular chocolate chips might make the dough fall apart.


When you coat the inside of the cookie with a thin layer of chocolate, you may want to consider tempering the melted chocolate. This step normally isn't necessary when putting chocolate in desserts unless you're dipping something in chocolate and want to create a shiny, attractive coat that looks smooth. There's also a way to do it without a thermometer!

Ansel filled his chocolate chip cookie shot glasses with Tahitian vanilla-flavored milk, but others have gone further with the idea and used them as vehicles for booze (Kahlua and Bailey's come to mind), panna cotta, or ice cream. Over on Reddit, some users suggest using the outside of the muffin tin to form a bigger bowl for ice cream.


While Ansel has popularized the cookie "shot glass," we should note that he's not the first to make this creation. There's a great recipe over at Whisk Blog for gingerbread cookie cups as well as Shotibles, a Tumblr devoted to edible cups and the confections they contain.

For the truly lazy, you can create chocolate chip cookie and milk shooters that give you the same feel as an edible container for a lot less effot. These don't even require you to make the cookies, if you're in a big rush. Get the full instructions here.

Readmore →

No comments

For those who like a hint of mint in their chocolate but dont like the green added sweet , somewhat mint taste they add in the factory, i fo


simple, one step cure to add to almost any oven baked treat.

Step 1: Purchas

Grab your favorite premade cookie dough.

Step 2: Grab Some Tic Tacs....the Peppermint Kind. White to Be Exact.

Crush the tacs a little. I used the bottom of a glass. Dont crush too much though to retain some crunchy texture.

Step 3: After Laying the Cookie Dough

Take the crushed tic tacs and sprinkle on top, pressing slightly into the dough.

Step 4: Bake as Directed

Viola....mint chocolate chip cookies qith a little bit of a crunchy texture from the tic tacs.

Enjoy
Readmore →

No comments

Common knowledge is a funny thing: it represents a majority's opinion on a particular subject and somehow makes that opinion fact. If that 'fact' goes unopposed and unchallenged, then it is passed on and preserved from one generation to the next—regardless of whether it is true or not.

A lot of outdated common knowledge seems comical to us today. We obviously know that health isn't dictated by humours and bile, or that electric fans won't kill us while we're asleep. But food myths continue to persist, despite science's evidence to the contrary. This is likely because food is such a big part of our lives, and so integral to our health and happiness.

Here are ten of some of the most common food myths that just won't disappear:

1: Milk Can't Be Frozen

Actually, it's perfectly fine to freeze milk according to The Dairy Council of California. Milk expands when it's frozen, which may have perpetuated the myth... but since milk is 85-95% water, it expands just as much as water would if frozen in larger quantities.


If you do decide to freeze your milk, understand that the quality and texture will be slightly different when thawed. Therefore, defrosted milk is best for recipes and not for direct drinking.

2: Brown Eggs Are Healthier Than White Eggs

They just look so much more wholesome... but alas, the truth is that there is no nutritional difference between the two. The difference in color is completely due to the color of the hen that laid the egg. As for which came first, the chicken or the egg... well, I'm not even going to touch that one.


 3: Keeping Bread in the Fridge Keeps It from Getting Stale

Turns out that keeping bread in the fridge unfortunately does the opposite—the bread stales faster, but not for the reasons you'd assume.

When bread dough is formed, the structures that hold flour's starch together are broken apart with water and kneading. However, these crystalline structures start to reform soon after the bread is baked and removed from heat.

Cold temperature actually reinforces these stiff structures, which causes the bread to stale. Therefore, you have a much better chance of enjoying your bread at the consistency you know and love by keeping it away from the fridge.


Bread molds faster at room temperature, though, so I suppose the bottom line is this: for best quality, enjoy your bread the same day it was baked or freeze it to enjoy later.

4: Pork Must Be Cooked Until Well-Done for Safety Reasons

I've seen people swear up and down that pork must be cooked until well-done to prevent trichinosis, a parasitic disease caused by roundworm larvae that are intact in raw pork. Turns out that as of 2011, the USDA says it's okay to remove your pork roast or pork chop from heat at 145ºF, so long as you allow it to rest for 3 minutes as the rest of your meat reaches the same temperature.


Apparently, trichinosis hasn't been an issue for decades because of much-improved meat handling and processing standards—the real fear was the reduced heat not being high enough to kill salmonella. For whole pork cuts, 145ºF does the job. However, ground pork still requires an internal temperature of 160ºF.

5: Honey Is Healthier Than High-Fructose Corn Syrup

High-fructose corn syrup has recently been the Big Baddie of sweeteners, while honey has sailed by on its natural and healthy origins. Well, according to a recently-released study, it turns out that sugar is sugar, no matter what you eat.

Both honey and HFCS contain similar ratios of fructose and glucose; the largest difference between the two is their origins. And because their compositions are similar, they cause the same effects in people who ingest large quantities of either.


The real enemy here is our addiction to sugar, but that's another story for another time.

6: Low-Fat Versions of Grocery Items Are Better for You

The long and short of it is that you're better off getting the full-fat versions of your favorite cookies, chips, and other snacks.

Low-fat foods have been found to have five times the amount of sugar that their full-fat counterparts do, largely because manufacturers were under pressure to keep the products' taste and texture as similar as possible.
Since higher levels of sugar over time in the body lead to an increased chance for diabetes, heart disease, and dental issues, it turns out that low-fat is likely the worst option you can choose if you're trying to watch your health!

7: Storing Potatoes with Apples Prevents Early Sprouting
I wish this fun food hack were true, but it's not. Storing apples with potatoes only causes the potatoes to sprout faster—and causes the apples themselves to mold as well.


The primary reason is ethylene gas, which is emitted by apples and encourages sprouting and ripening. However, apples aren't the only emitters of ethylene gas: here's a list of ethylene-emitting and ethylene-sensitive produce that should be stored far away from each other... unless you're trying to speed up the ripening process, of course.

8: Searing Traps the Juiciness Inside of the Meat
Time to bust this very popular myth! If high heat and searing trapped the moisture inside of the meat, we wouldn't hear that sizzling sound so well-associated with searing. That's right: the sizzle is the sound of the meat's moisture escaping.

According to Harold McGee, the author of On Food and Cooking (my bible of cooking facts), the only way to ensure that your meat stays juicy is to reduce its time exposed to high heat.


Searing is still important, though, due to something called the Maillard reaction. High heat causes this reaction to occur, which develops and deepens the flavor of the meat. (This reaction is the same reason that you should smash your burger on the grill, by the way.)

9: Food That Contains Mayo, Like Tuna Salad, Spoil Quickly

If you've ever fretted about bringing tuna salad sandwiches or potato salads to a picnic with no fridge in sight, don't worry—if you're using store-bought mayonnaise, the egg yolks used are pasteurized and actually discourage the growth of bacteria. The more likely culprits of your spoiled picnic are the ingredients you add to the mayonnaise, not the mayonnaise itself.


The rules change for homemade mayo, however: unless you are using pasteurized egg yolks, anything made with homemade mayo should either be consumed immediately or refrigerated until ready to consume.

10: Lobsters Scream When Added to a Pot of Boiling Water
This myth is pretty horrifying—lucky for you lobster lovers, this is untrue.

The noise that sounds like the lobster screaming is actually air coming from its stomach and out of its mouth, which still sounds like the technical definition of screaming, until you realize that lobsters don't have vocal chords or a developed nervous system that registers pain in the first place.


Have More Myths You'd Like Us to Bust?
Of course, there are way too many food myths for us to debunk in one article... otherwise, we'd be here forever. If we've missed any, drop your knowledge on us in the comments and let us know.
Readmore →